
hi friends,
The first lesson here iam going to tell you is how to change the color of an iris.
CHANGING THE IRIS COLOR
 To change the color of an iris which is part of the human eye. I'll show you a technique that is flexible and easy to adjust using a Mask and a Hue & Saturation adjustment layer.
1. Preparations
 Start by making a copy of the background layer, by left clicking on it with the mouse button and dragging it to the New Layer icon ; Photoshop creates a copy of the background layer and makes this new layer active.
2. Selecting the iris
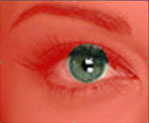
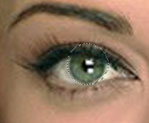
 First we have to create a selection. Select the Elliptical Marquee tool and then move your cross hair cursor to the exact middle of the iris.Now hold down the Shift + Alt key (Alt is Option key on the Mac) and hold the left mouse button. Now draw the circle around the iris. Leave some extra space as shown in the example. (The Shift key ensures that we have a perfect circular selection. The Alt key defines the initial location of the cursor as the center of your selection).
Free Video Games

3. Adding a mask
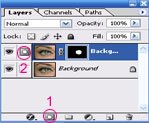 With the layer still active, add a mask. Click on the Add Layer Mask icon (1); a new mask appears.
Also notice that a new icon appears in front of the layer (2) that reminds us that we have a layer mask and that the layer mask is active. A layer mask also has a double border if it's active and single one if it's not active.
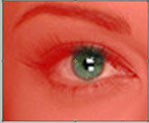
With the mask selected press the \ key on your keyboard.This will show the mask in a transparent red color. This will make it easier for us to make the necessary adjustments.You can always turn this transparent mask off by pressing the \ key again.
4. Adjusting the mask
 Go in the menu to Filter/Blur/Gaussian Blur... and slightly blur our mask. Use a radius of about 4 pixels. Normally this should be enough, but we want to include the upper eye lid in our mask, since we don't want to change its color.
To do that we have to select black as our foreground color and extend the mask by painting on the upper eye lid with a small soft brush . You might also consider to extend the mask around the iris. Paint with white to remove parts of the mask.
5. Adding a Hue & Stauration adjustment layer
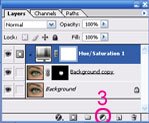 Now hold down the Alt (option key on the Mac) key and click on the New Adjustment Layer icon (3). Don't release the Alt key yet! Select Hue/Saturation... in the little window that pops up.
The New Layer window pops up. Release the Alt key.
Select the option 'Use previous layer to create clipping mask' and click Ok. The Hue/Saturation window pops up.
6. Changing the color of the iris
 We're now going to change the hue of the blue colors only, since the iris is blue. Do do that we first have to select Blues in the Edit box (4). We now have to select the blue in the iris. Select the eye dropper tool (7) and sample the blue color of the iris. Use the eye dropper + tool (8) to add all the other blue variations of the iris.
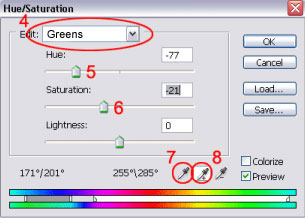
Now we slide the hue slider (5) until we have the color that we prefer. You also might consider to adjust the saturation slider (6).
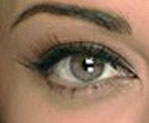
Click Ok and we're done.
Final words
This technique has several advantages, since the adjustments (masks, hue & saturation layer) are non-destructive, the original stays intact. It's easy to fine tune the mask or hue & saturation, making it a perfect technique for several other corrections also.
The first lesson here iam going to tell you is how to change the color of an iris.
CHANGING THE IRIS COLOR
 To change the color of an iris which is part of the human eye. I'll show you a technique that is flexible and easy to adjust using a Mask and a Hue & Saturation adjustment layer.
1. Preparations
 Start by making a copy of the background layer, by left clicking on it with the mouse button and dragging it to the New Layer icon ; Photoshop creates a copy of the background layer and makes this new layer active.
2. Selecting the iris
 First we have to create a selection. Select the Elliptical Marquee tool and then move your cross hair cursor to the exact middle of the iris.Now hold down the Shift + Alt key (Alt is Option key on the Mac) and hold the left mouse button. Now draw the circle around the iris. Leave some extra space as shown in the example. (The Shift key ensures that we have a perfect circular selection. The Alt key defines the initial location of the cursor as the center of your selection).
Free Video Games
3. Adding a mask
 With the layer still active, add a mask. Click on the Add Layer Mask icon (1); a new mask appears.
Also notice that a new icon appears in front of the layer (2) that reminds us that we have a layer mask and that the layer mask is active. A layer mask also has a double border if it's active and single one if it's not active.

With the mask selected press the \ key on your keyboard.This will show the mask in a transparent red color. This will make it easier for us to make the necessary adjustments.You can always turn this transparent mask off by pressing the \ key again.
4. Adjusting the mask
 Go in the menu to Filter/Blur/Gaussian Blur... and slightly blur our mask. Use a radius of about 4 pixels. Normally this should be enough, but we want to include the upper eye lid in our mask, since we don't want to change its color.
To do that we have to select black as our foreground color and extend the mask by painting on the upper eye lid with a small soft brush . You might also consider to extend the mask around the iris. Paint with white to remove parts of the mask.
5. Adding a Hue & Stauration adjustment layer
 Now hold down the Alt (option key on the Mac) key and click on the New Adjustment Layer icon (3). Don't release the Alt key yet! Select Hue/Saturation... in the little window that pops up.
The New Layer window pops up. Release the Alt key.
Select the option 'Use previous layer to create clipping mask' and click Ok. The Hue/Saturation window pops up.
6. Changing the color of the iris
 We're now going to change the hue of the blue colors only, since the iris is blue. Do do that we first have to select Blues in the Edit box (4). We now have to select the blue in the iris. Select the eye dropper tool (7) and sample the blue color of the iris. Use the eye dropper + tool (8) to add all the other blue variations of the iris.
Now we slide the hue slider (5) until we have the color that we prefer. You also might consider to adjust the saturation slider (6).
Click Ok and we're done.
Final words
This technique has several advantages, since the adjustments (masks, hue & saturation layer) are non-destructive, the original stays intact. It's easy to fine tune the mask or hue & saturation, making it a perfect technique for several other corrections also.
posted by Guruz @ 7:04 AM
![]()
![]()


0 Comments:
Post a Comment
<< Home